PSDTUTS Updates |  |

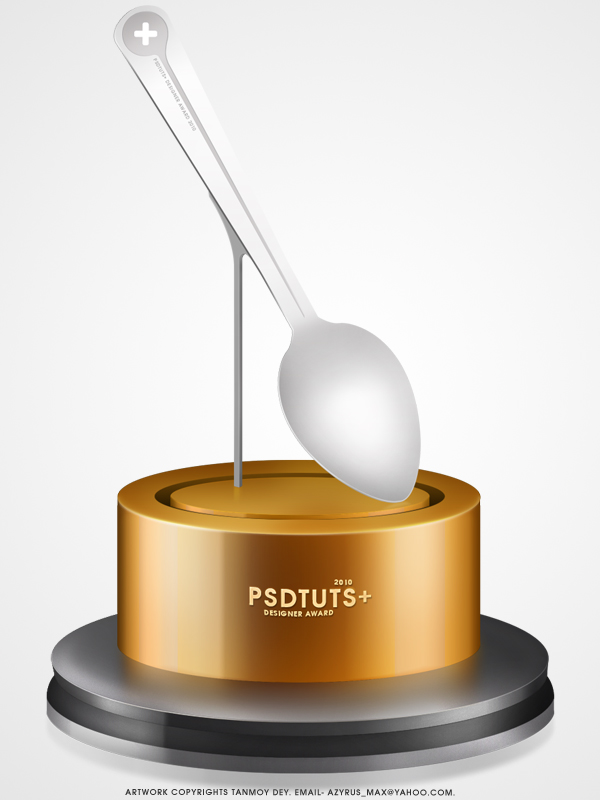
| Draw a Trophy Icon in Photoshop Posted: 17 Sep 2010 07:00 AM PDT Today, we will demonstrate how to draw a trophy icon in Photoshop. Let’s get started!
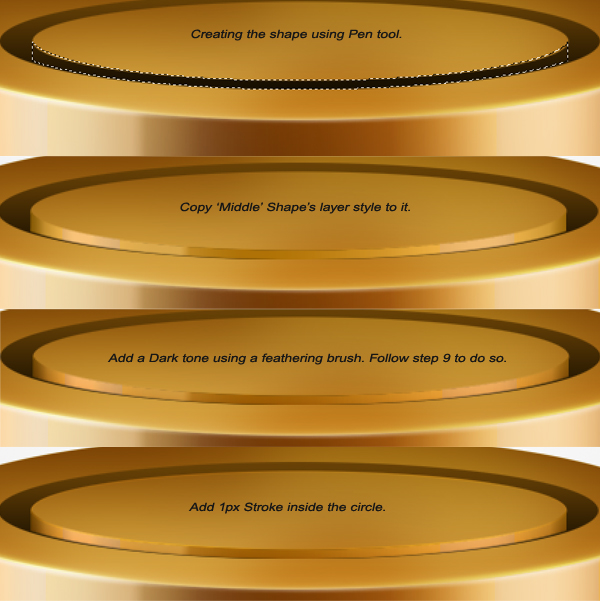
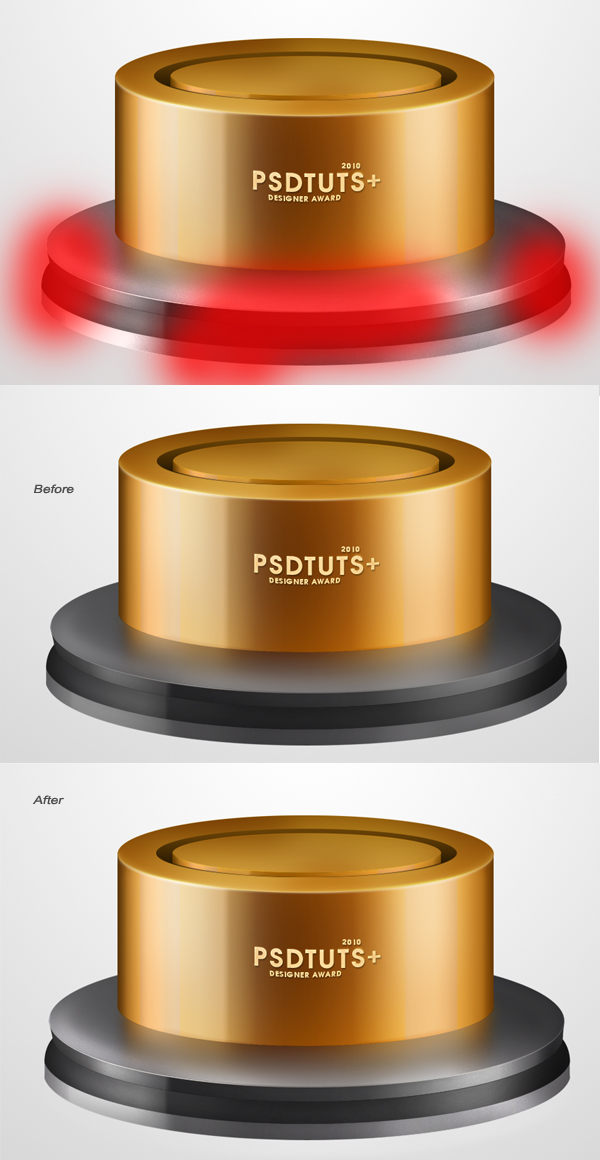
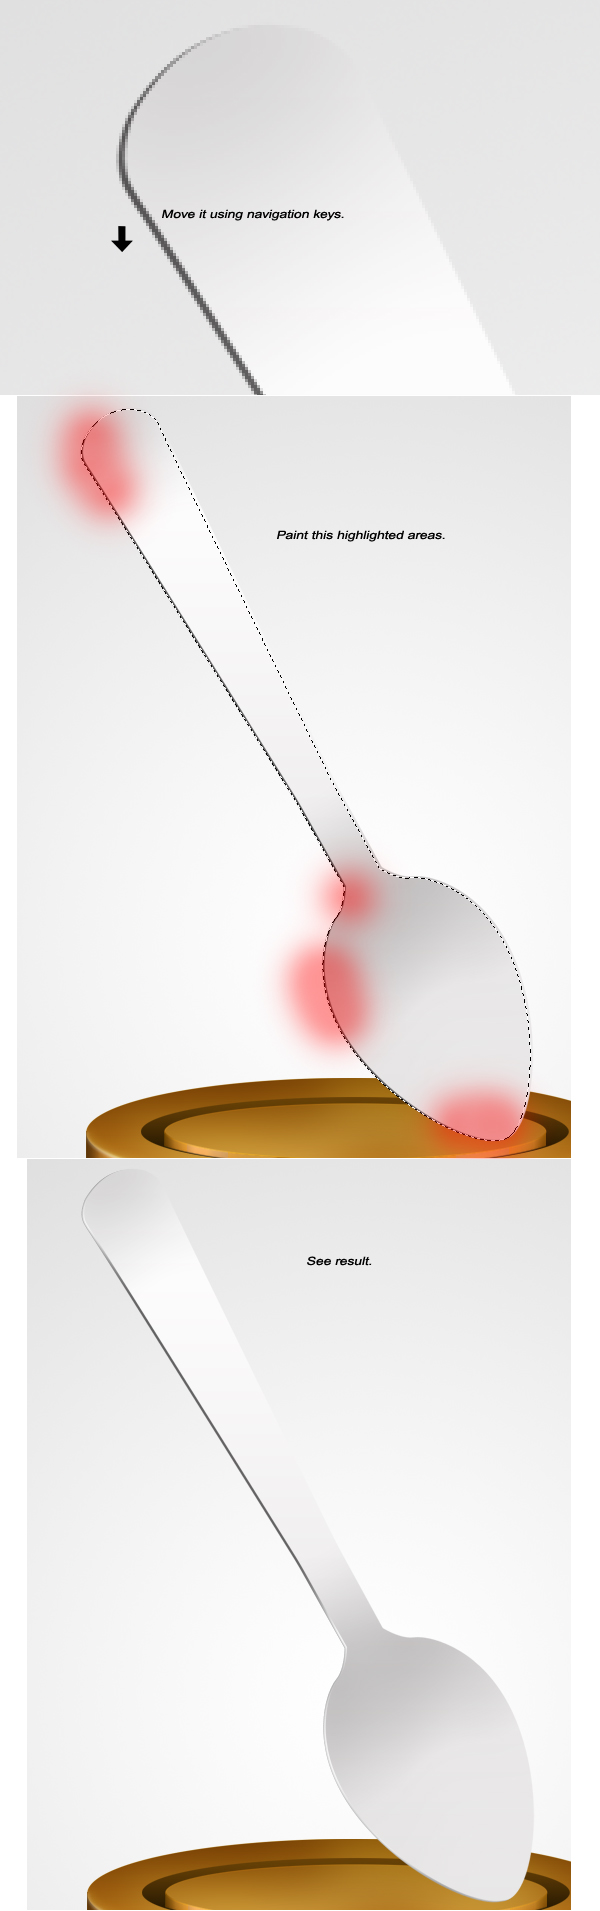
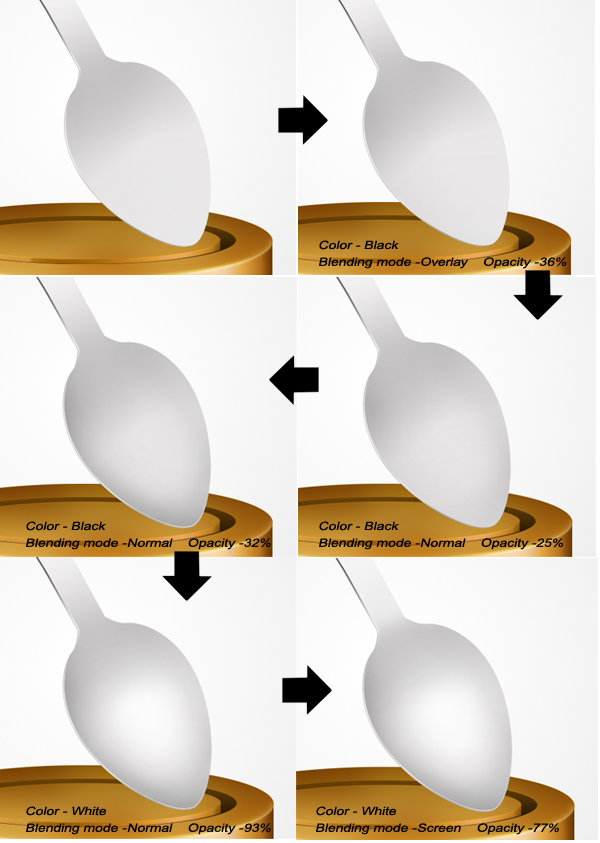
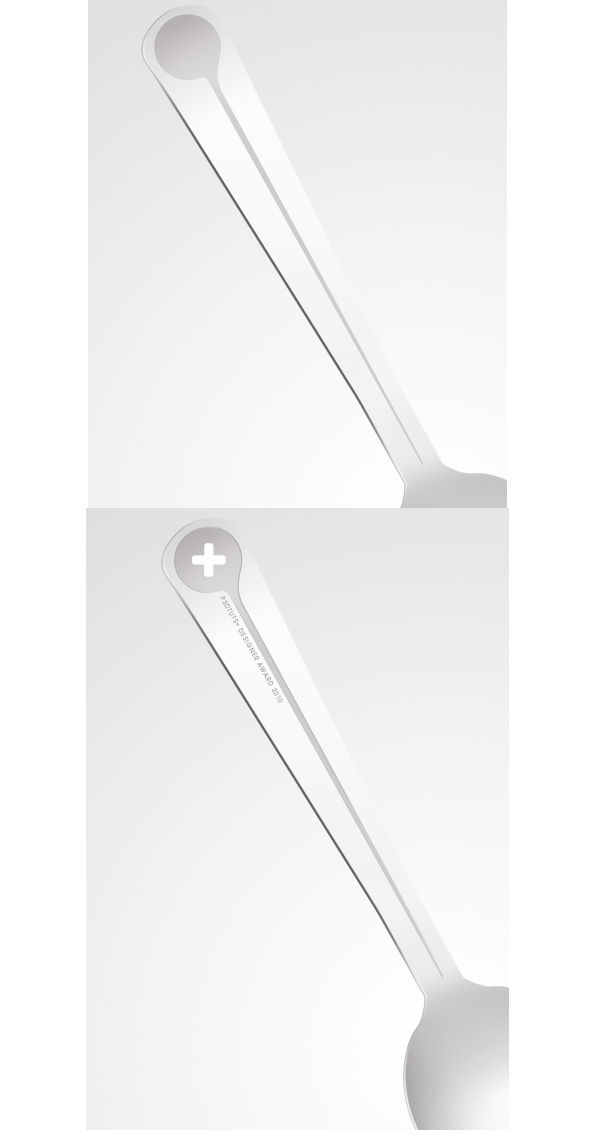
Step 1Create a new document, 1000 x 1200 px. Before we proceed with this tutorial, take a look at the layer setup and arrangement, which will help you organize your layers a bit better. 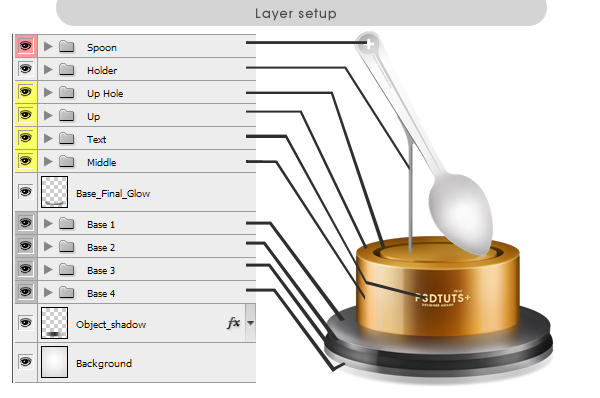 Step 2Create a new layer, name it ‘Base 1′. Select the Elliptical Marquee Tool (M), now go to Options bar. Style: Fixed size, Width: 734px, Height: 190px. Now click anywhere on the canvas and place it as it shown. Apply the following layer styles. Note: If you draw any random shape in Photoshop and wanted to know it’s size, just go to Window > Measurement Log > Click on Record Measurements. 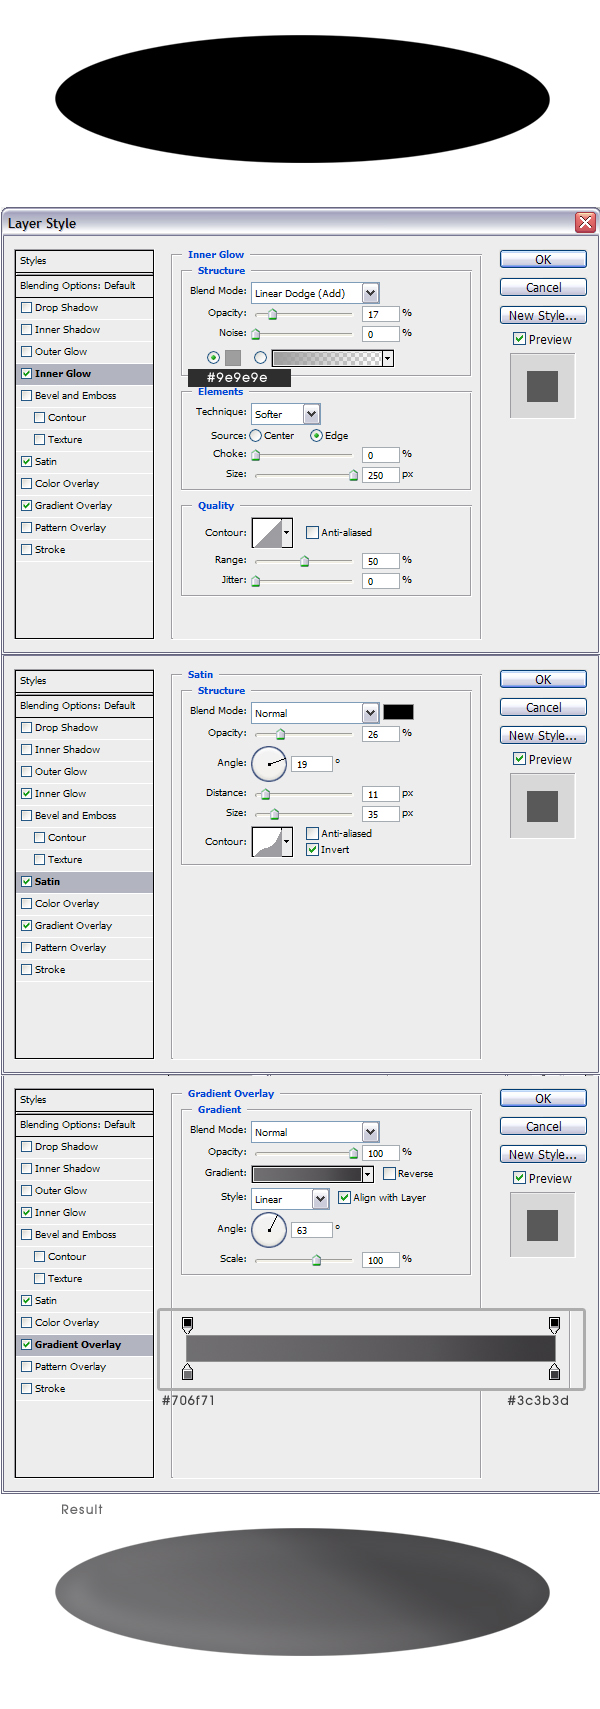 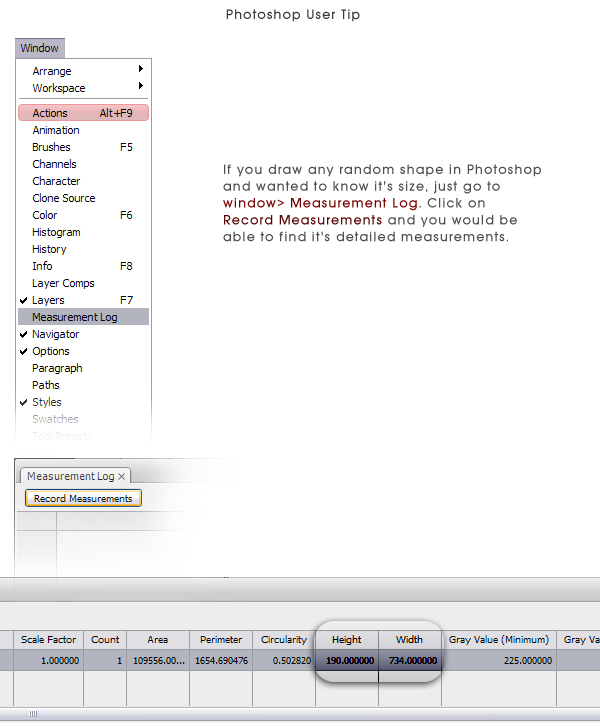 Step 3Cmd/Ctrl + Click on the layer thumbnail of ‘Base 1′ to make a selection. Go to Edit > Stroke. Width: 1px, Color: Black, Location: Inside. Follow the same technique and place a white stroke on it. Create new layers for each stroke. 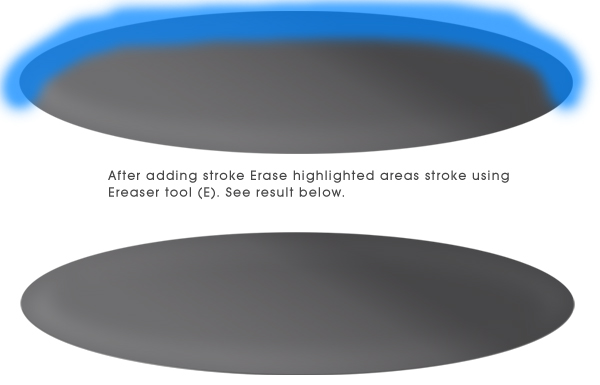 Step 4Create a new layer, Cmd/Ctrl + Click on the layer thumbnail of ‘Base 1′. Take Brush tool, use a feathering brush, color: white. Repeat step using black color. For white color set layer blending mode to Overlay and opacity to 17%, For black color set layer blending mode to Soft light and opacity to 58%. 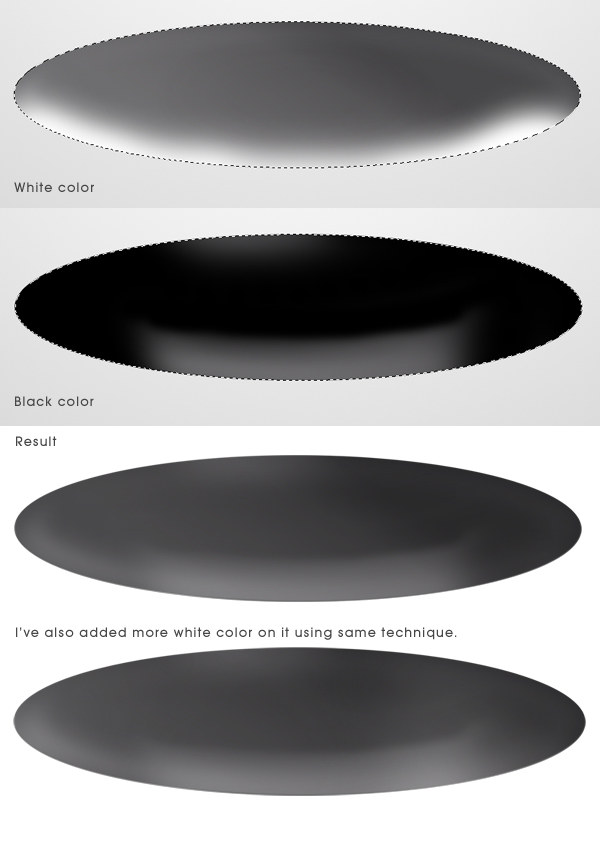 Step 5Create a new group named ‘Base 1′ and place all the layers inside it. Now copy ‘Base 1′ layer and place it as shown. You should take a look at step 1 again for layer adjustment. Drag ‘Base 1 copy’ down, change it’s name to ‘Base 2′ and place it outside ‘Base 1′ group. Grab pen tool, follow next image. After you complete this step you can see clearly what we’ve done in Step 3. After that copy layer style of ‘Base 1′ and apply it to ‘Base 2′ layer just change the Gradient overlay. 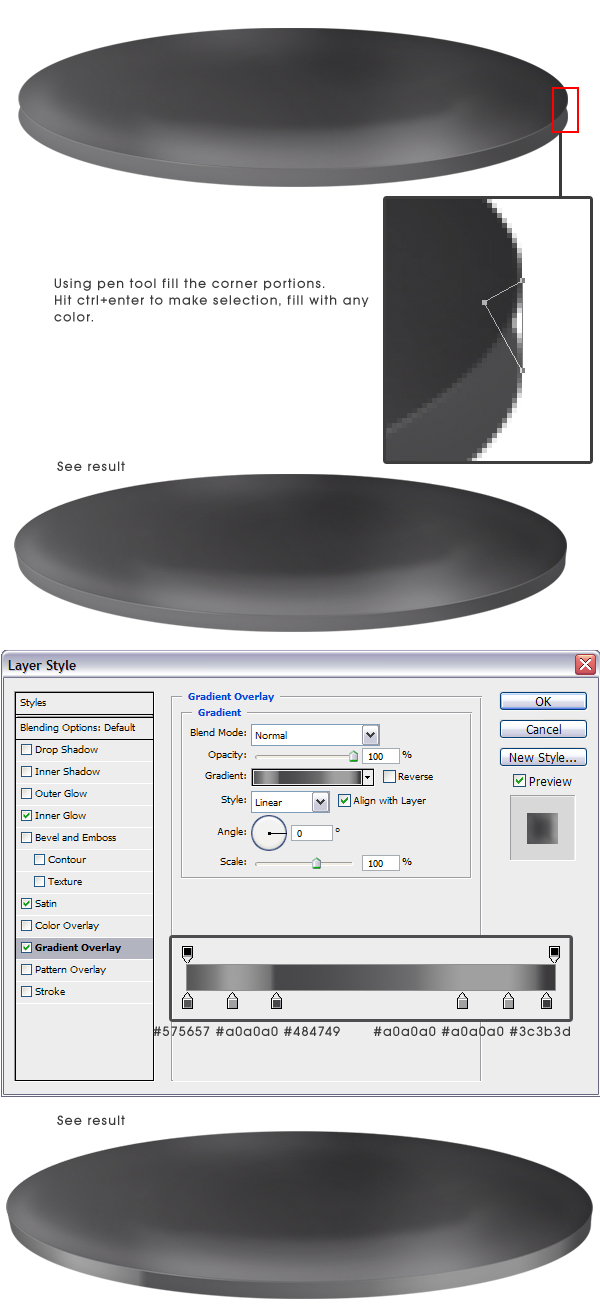 Step 6Create a new layer named ‘B2 Dark’. Cmd/Ctrl + click on the layer thumbnail of ‘Base 2′. Fill it with black color. Set Layer blending mode to Soft light & opacity to 90%. Do not deselect, create a new layer named ‘B2 White’. After that, use Brush tool (B) and a feathering brush and start painting as shown on image. Set this layer’s blending mode to Overlay. 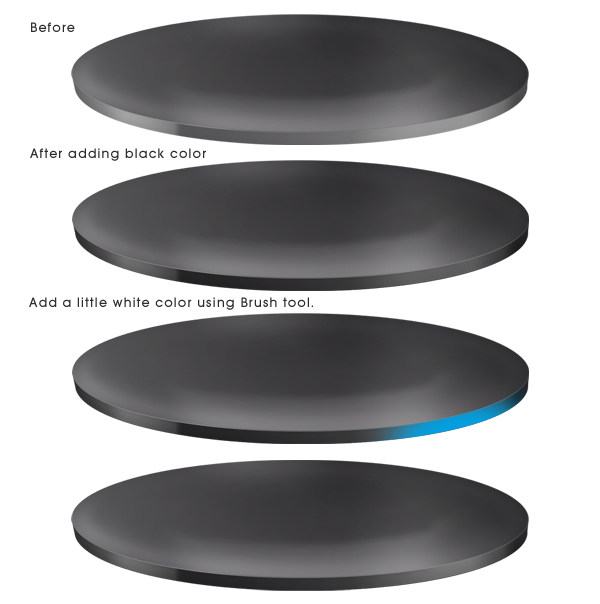 Step 7We can proceed with this tutorial using same techniques that I’ve used previously. Follow step 2 – 6 to create another two bases.  Step 8Use the Elliptical Marquee tool and pen tool to create the following shapes. After that, apply the Layer Style to the ‘UP’ layer. Create new layer for each shape. Place ‘Up’ shape over ‘Middle’. 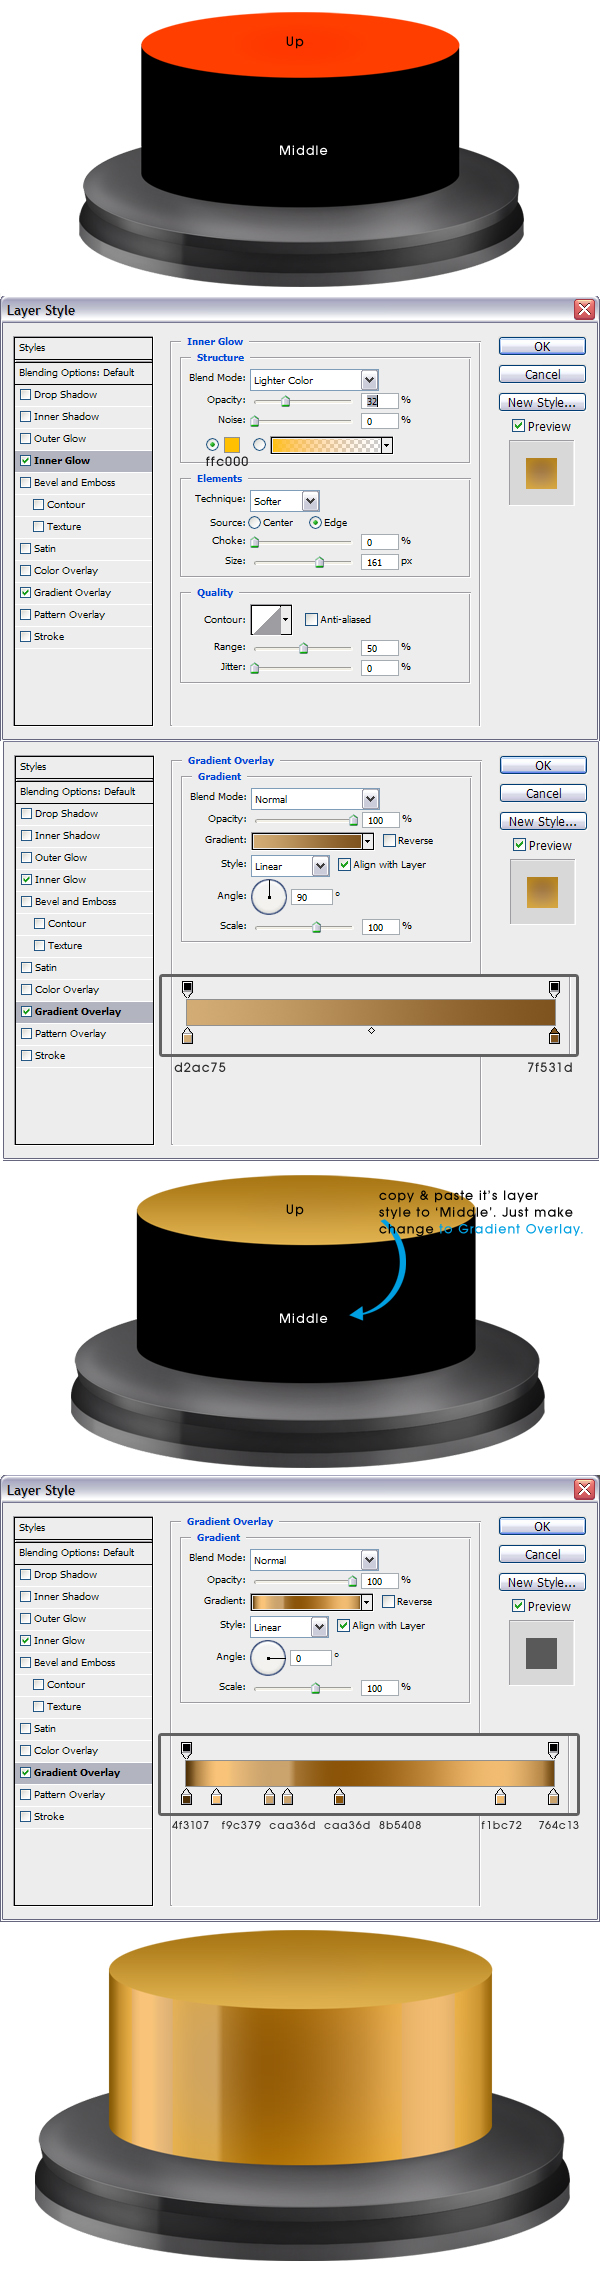 Step 9Cmd/Ctrl + Click on the layer thumbnail of ‘Middle’ take brush tool and use a feathered brush, color: black and start painting as shown on image. 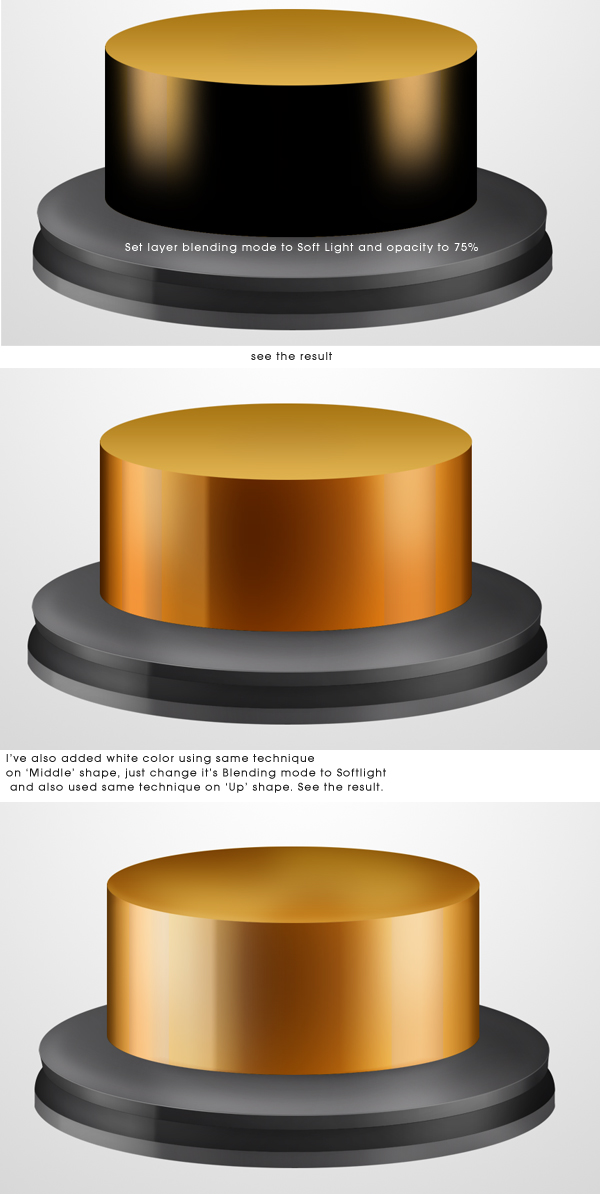 Step 10Add a 1px white stroke on ‘Up’ shape. Set its blending mode to overlay. After that create a new layer and add a 2px white stroke to it. Go to Filter > Blur > Gaussian Blur. Radius: 2px. Create another new layer and again add a 3px white stroke on it. Press Cmd/Ctrl + F. Take A Feathered Eraser Brush and erase the highlighted areas. Set its blending mode to Overlay. Follow next Image. 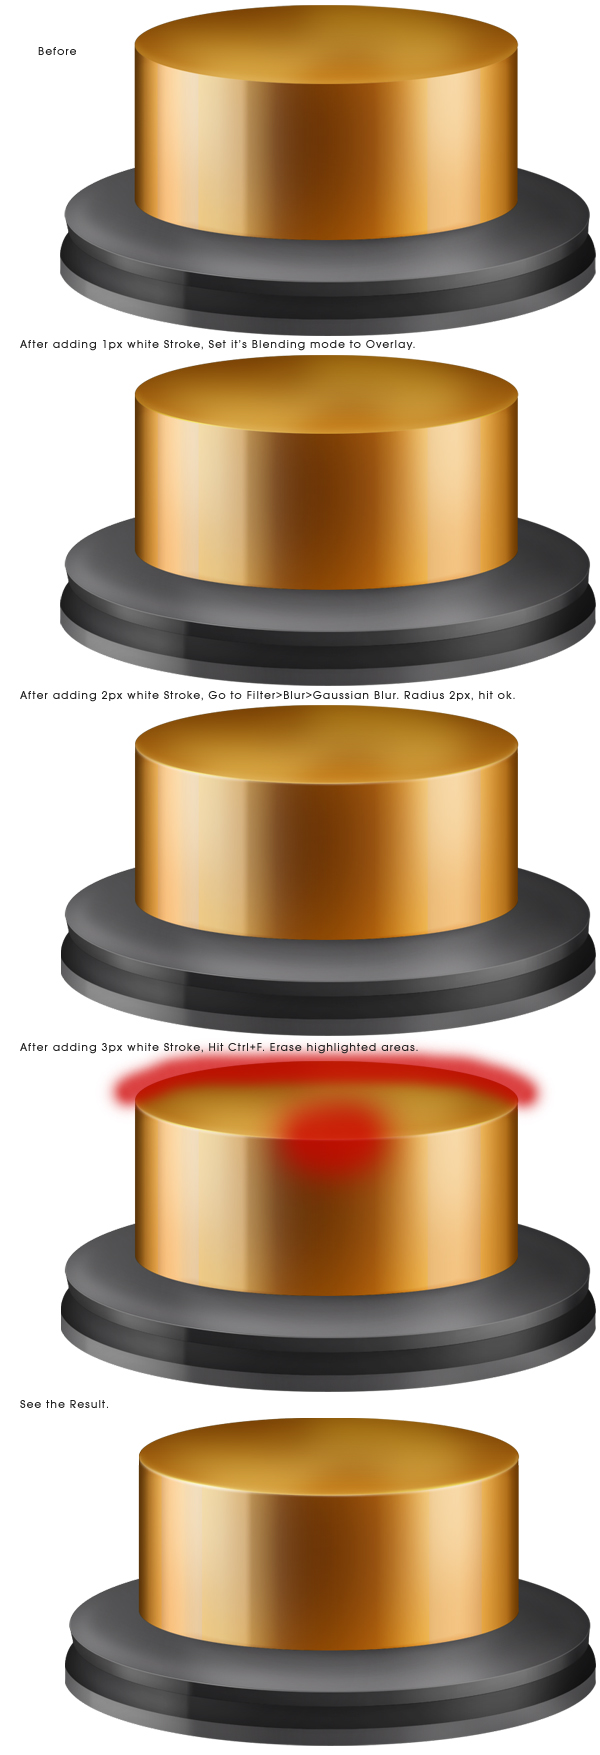 Step 11Select ‘Middle’ shape layer including its white and black painted layers, duplicate them, press Cmd/Ctrl + E. Drag it down ‘Middle’ shape layer. Press Cmd/Ctrl + T, right click on it, select flip vertical, use down navigation key to move it down, hit enter. While selecting ‘Middle’ shape duplicated layer, Cmd/Ctrl + click on the layer thumbnail of ‘Base 1′. Press Add Layer mask icon at the bottom of Layer Panel. Now create a new layer at the bottom of ‘Middle’ duplicated layer. Select both layers and press Cmd/Ctrl + E. That will merge down the layers. Take a feathered eraser tool and erase highlighted areas. Now go to Filter > Blur > Gaussian Blur, Radius 5px. press ok. See the result. 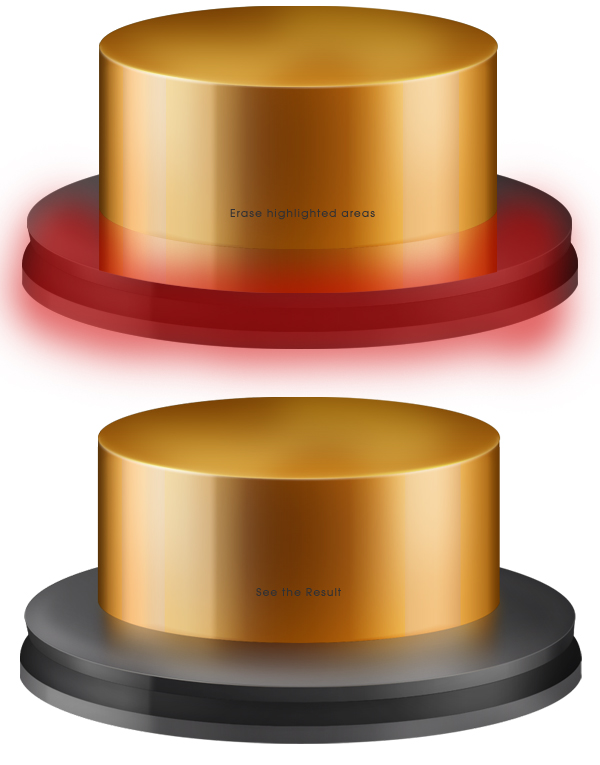 Step 12Press T and type out some text. Follow next image. After that, apply the following layer styles. After that, place additional text using the same technique.  Step 13Use Elliptical marquee tool, go to options bar > Style Fixed Size: Width: 428px, height: 69px, place it as shown on image. Fill it with any color. Press Cmd/Ctrl + D. Create another fixed size circle inside it, Width: 382px, Height: 57px press Delete. Apply following layer styles. 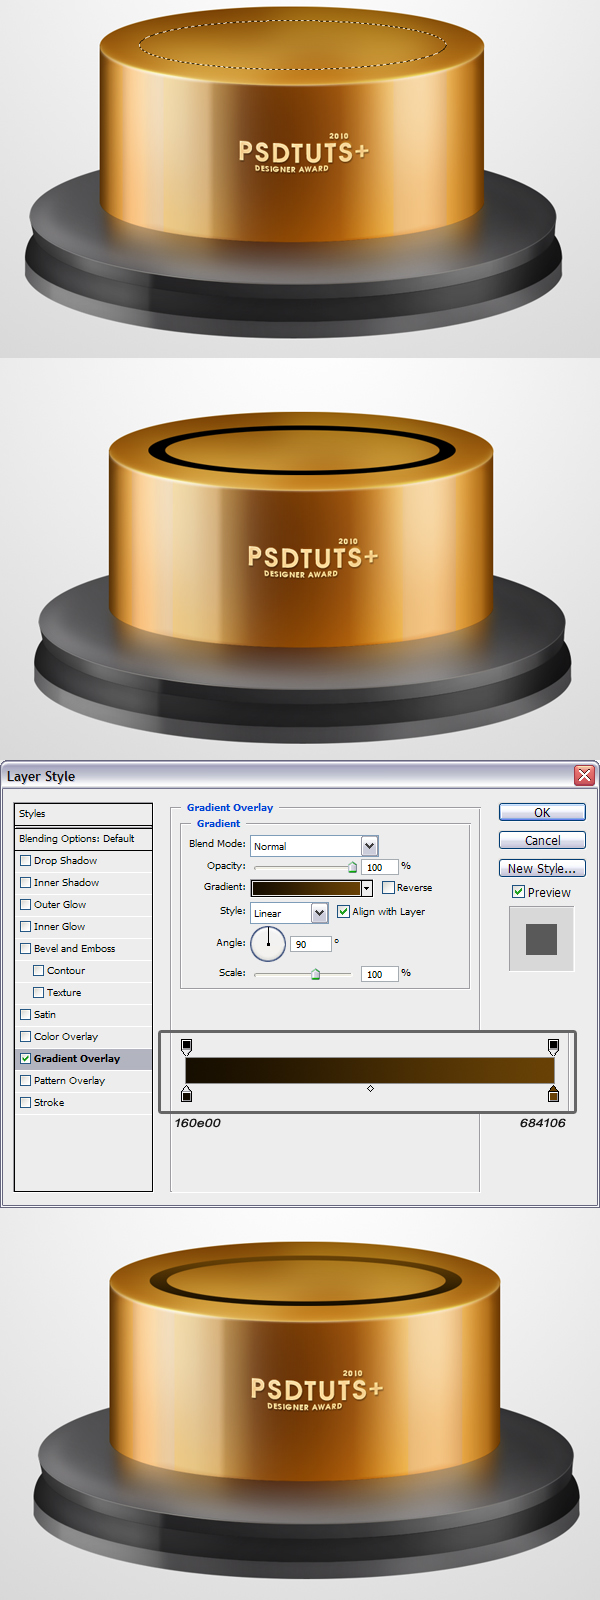 Step 14 |

| You are subscribed to email updates from Psdtuts+ To stop receiving these emails, you may unsubscribe now. | Email delivery powered by Google |
| Google Inc., 20 West Kinzie, Chicago IL USA 60610 | |